Sunday, August 1, 2010

The Secret to Making Antique Paper

I LOVE antique books and collect antique school books. Nothing can match the mellow, rich colors of vintage papers and books, but I sure can try to recreate it in miniature. Below is a House of Miniatures desk kit that I just stained and finished (although the hardware is still giving me fits). But while I had the wood stain out, I decided to do a little experimenting...
I had printed out several book covers from one of those printables sites but they just didn't look realistic enough for me so I grabbed a few of them and started painting them all with the same wood stain I was using on the desk! I even used the same Ceramcoat Satin Varnish. Here they are:
Much better! When making books for bookshelves, I usually fold and glue the paper covers around a piece of white foam (like kids use for crafts). Fast and easy! This time I decided I wanted pages, real paper pages. I folded the newly stained covers as usual and put a nice smear of tacky glue in the binding part and started tucking pages in. I thought it looks much more realistic for a setting like on this desk:
Of course, white paper in an antique book? That just wouldn't do! I also think that good old copy paper can look a tad thick. I made a ton of antiqued paper for the books and also stuffed the drawers! Can you see the subtle shading of tans in the papers below and how "to scale" the thickness of the paper is? They look even better and more antiqued in real life. The Secret of Making Antique Paper is below....
Parchment Paper!
Yup, the cheap stuff you buy in the grocery store for baking.
(**You CANNOT use wax paper for this!!**)
1. I used my paper cutter to cut long strips.
2. I then cut those strips into paper size widths.
3. The antiquing magic happens when you take all those pieces, put them in a pie tin
and bake them until you have the right color!
Parchment paper turns the most wonderful shades of antique tans when cooked. I have baked whole sheets at a time thinking it would be a shortcut before, but it mostly browns on the edges. Cutting them first is the key.
Just be ready to explain to your family why there aren't any cookies being served afterwards :)

Happy Baking!!

Friday, July 30, 2010

Quarter Scale Whimsy House


I just received a 1/4 scale version of the newly named "Baslow Ranch" house in the mail from Greenleaf as a thank you for entering their contest. It's the first time I've worked in this scale and I wasn't quite sure what I would do with it at first. The thought of recreating my Orange Blossom in that scale crossed my mind but working that tiny?? I was exhausted just thinking about it! So I just decided to do a collage effect using papers that simply make me happy! The words printed on one of the papers are all places and things from my childhood and there are a few daisies sprinkled throughout so this is personal and pretty for me even if it's a tad unorthodox! :) I think I'll still add the porch and maybe some cut-outs of furniture inspired by wonderful vintage lithographed houses like the Bliss houses. This little-bitty house will go on my desk at work just to make me smile.

Wednesday, July 21, 2010

Checkered Floor Tutorial

I love Swedish design, with painted wood floors and the light and airy whites, greys, and blues! It lends itself so well to the shabby chic style that is so popular now too. I decided I wanted to do a painted wood floor effect in my Orange Blossom that was inspired by that look, using a blue-grey color and a whitewash effect. Here is how I did it:

1. Instead of applying individual wood strips, I decided to
score plank lines into the plywood for a wood floor effect. Since I wanted a rougher look, I carved pretty heavily in some places. If you look carefully at the picture below, you can see the lines I carved in. It you want a solidly painted two color floor, this is the time to apply the lighter color paint over the whole floor, then let it dry completely. It wanted a white washed look so I started with the plain wood.

2. Time to get out the
painter's tape! I find it best to start with the center strip. Take a piece of painter's tape and apply it from one corner to the opposite corner. Just line up the edge of the tape with the point of the corner and you will have a perfectly straight and centered tape line.

3. Label another strip of the same tape to use as a spacer (see the picture below). Line it up exactly with the first piece and then put your second strip down, also touching the spacer. Keep moving the spacer and applying tape across the entire floor. Turn the wood and repeat the whole procedure going in the opposite direction. You now have a perfectly spaced tic-tac-toe board. Almost there!4. Now it's time to cut out the overlapping areas so that you will have a perfect checkerboard pattern! Everywhere the two strips of tape overlap will be cut out. Gently use a craft blade and just follow the edges of the tape... the nice straight lines are right there for you to "trace."
5. Now peel off those overlapping pieces of tape.6. It's a perfect checkerboard now! Make sure all of the remaining tape is still sealed down tight before you move to the next step: painting. I used French Blue (although it looks white in the picture below). Since I wanted the wood to still show though, I brushed it on lightly with a foam brush and wiped off any places where it looked too thick. Let it dry.
7. Time to peel tape again and you are done! I added a whitewash effect over the whole finished floor for the effect that I was going for. For a really aged effect, you can sand in front of doorways and in high traffic areas. Voila, complete!

Tuesday, July 20, 2010

A Giveaway to Enter

Elena, of Mondodifavola is having a giveaway! So many generous people are a part of our hobby! Her work is simply lovely as you can see in the picture above. Click on the name of her blog in the first sentence if you'd like to look around, see her etsy work or even enter for the giveaway yourself! Beautiful pieces of mini art.

Flooring tutorial from me coming soon...

Sunday, July 11, 2010

I See Sea Shells...

...from the seashore! These beauties are from the Gulf of Mexico. There is a coquina, and coral and cockle shells. At the very bottom is a shell called a lady slipper but it got a little crack in in while I was bringing it home. It was very fragile you see because...
They are minis, of course! :)
Don't forget to click on the pictures to see these close up.

Friday, July 9, 2010

Toothpicks, the wonder tool

Who knew that there were so many kinds of toothpicks available?? Besides using them for applying paint and glue, the decorative cocktail varieties make great handles and details for mini items. I just found perfectly squared off ones that are exactly the size of chair spindles. (By the way, I've found the best way to cut them is to roll them back and forth under the blade of a craft knife... nice rounded cut.)

See the little box below? Those twisty corners are the ends of fancy toothpicks (already carved). They did a great job serving as the joint for each of the side panels and covered any of my messy cutting. See the carved handle? Toothpick. The small points holding up the handle? Toothpick! What else could you do with them?

Thursday, July 1, 2010

Ultimate Illusion!

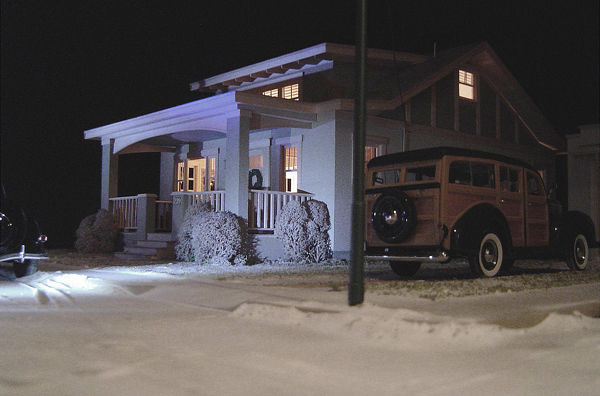
Don't you just love the shimmer of streetlights on wet streets?
Or the dry, crunchy sound of snow beneath your tires as you pull into your driveway at the end of a long day?
Don't you love it even more when that street, house and car is really a miniature?
This is the amazing work of artist and model builder Michael Paul Smith who has a gift for realism and using photography to bring his models to life! I honestly thought I was looking at real vintage photographs. What an amazing talent! He loves to share little tips about his technique too; how generous is that?! Click on his name above to link to his Flickr account or to this link for a write up on the "Beautiful Life" site with more beautiful pictures. Maybe you can fool a friend or two :)

LinkWithin

Related Posts Plugin for WordPress, Blogger...