Saturday, December 26, 2009
Country Kitchen
I love country kitchens! As soon as I saw the Westville dollhouse by Greenleaf, I knew it would have to be one of those homes where you enter directly into a warm kitchen that is the heart of the home and where most of the working and living takes place.
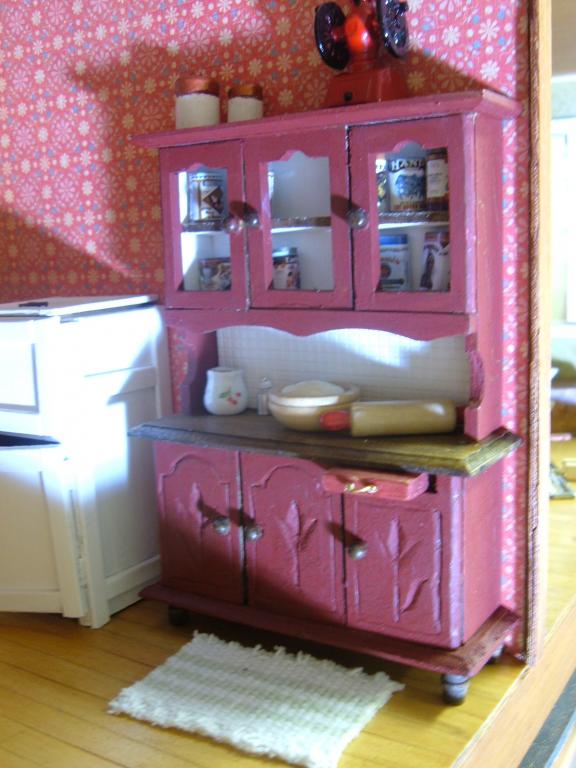
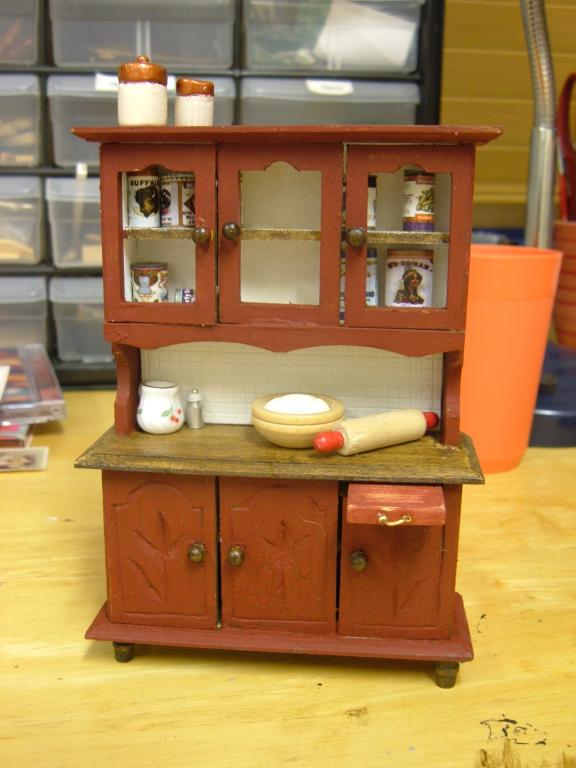
You can see the Michael's hutch from my previous posting and a tiny sliver of the living room that had the closet removed. Can you spot more pieces from those hutches? (The upper and lower cabinets near the sink). I put a lid on the bucket near the door which is for keeping kitchen scraps before they are taken out for composting. Can't have it smelling up the kitchen! The flour sacking dish cloth is ready for work on all those dirty dishes, if someone would finally install a faucet! It also looks like someone needs to pick up that fallen ice sign from the window or there won't be a delivery today, and for goodness sakes, the ice box door has been left open...
Wednesday, December 23, 2009
Multi Purpose Michael's Hutches
Michael's craft stores sell these wonderful $1 hutches that can be bashed into just about anything, like the framework to my built-in bookcase in the last post. Sometimes though, just a little tweaking makes it just what you need!
I took this darling one and carved in some arches and rough flowers on the bottom cabinet doors. I then cut out a portion of the top of the right hand cabinet door and slipped an longer piece of wood through the notch to make a cutting board. I glued in a little support underneath it inside with a little scrap of wood. Can't have the cutting board falling down while you're trying to use it!
I then covered the whole thing with an antiquing polish that gives it that rustic walnut look. You can still see that color on the main counter. Crackle finish was applied to the whole outside except for that counter and Ceramacoat's Barn Red paint was painted over that. The picture below is that closest to the actual color.
I took this darling one and carved in some arches and rough flowers on the bottom cabinet doors. I then cut out a portion of the top of the right hand cabinet door and slipped an longer piece of wood through the notch to make a cutting board. I glued in a little support underneath it inside with a little scrap of wood. Can't have the cutting board falling down while you're trying to use it!

Sunday, December 20, 2009
Adding Details to the Book Nook
Now that I removed the closet, there's a cozy place to curl up with a book or compose a little music. Pardon the feather duster on the shelf... there's construction dust to clean! (see previous postings for details).
Here it is as part of the living room. It still feels a tad empty... I'm really not sure what to do with all the middle space. I love how it "feels" though!
Closet? Who Needs a Closet?
In my last posting, I talked about how I make molding panels to add details along the stair wall of my Westville dollhouse. When it came time to attach it, I started thinking... a dangerous thing! That closet under the stairs was a big waste of space! I could put cleaning supplies and storage on display under there but I already had a whole attic for that. Hmm.. what if I take off the doorway...
Better already! The elf will have to move out!
I then used any and every tool that I could think of to hack away at the wood. I have a dremel but I really need lessons in how to use it. For me, sometimes hand tools like a utility knife just feel more satisfying as I hack away. The painted area of wall was the only visible wall space before.
I test fit part of a Michael's hutch to work as a "built in" bookcase and with a lot of sanding, finally made it fit. I then found a scrap of foam board to replace the side wall I had just cut out. Remember, I was just hacking away with the knife. If I had planned ahead I could have left that section of wall intact. Hindsight is 20/20!
Foam board also smoothed out the underside of the steps so there is a smooth sloping wall. I used textured scrapbook paper to line the back of the bookcase. I love how it imitates bead board! I had to patch in the wood floor before the final fitting, but again because this was a spontaneous "bash" I accidentally used the wrong stain. Sigh.
I trimmed it out with scraps of molding and a shelf on top of the bookcase. I used the same bead board look scrapbook paper on the side wall of the stairs to mask the foam board patch. Finally, you can see a couple of the wood panels I made in the last posting. I will be making a couple of final adjustments, like that mismatched angle, but finally, a little more floor space! I'm picturing a rocker and blanket to make a little reading nook. Time to rearrange furniture!
Monday, December 14, 2009
Molding Minus Math
I've often admired the molding and paneling details in so many dollhouses and wondered how anyone could make it look so beautiful and straight! Perfect angles too. I would still love to know from any of you who have ideas for me... please share your expertise. Since I didn't know how, I made it up!
First, I put newsprint against the wall I wanted to attach the molding to. In this case it was the wall under a staircase. Can you see the railing openings? I took a rubbing of it, just like back in elementary school when we'd make leaf rubbings!
I then drew lines with a ruler (this helped with the straight part!) wherever I wanted the moding to be attached. I needed really narrow molding which I didn't have and so decided to make my own of that too. In the picture below, you can see "ceiling and door trim" from miniatures.com. It was too wide of course so I cut strips of it. Voila...narrow molding! It's even the right size for picture framing.
The next step for me was to smear a little glue stick over the pencil lines so the molding wouldn't slip around. I laid a strip down, marked where it touched the pencil line and cut. I continued the same way on all my drawn pencil lines with a little sanding here and there and a touch of glue in the corners. I still have no idea what degree each angle is but I didn't have to using this method, thank goodness!
First, I put newsprint against the wall I wanted to attach the molding to. In this case it was the wall under a staircase. Can you see the railing openings? I took a rubbing of it, just like back in elementary school when we'd make leaf rubbings!
The fact that each piece was glued to the paper was very handy to when it came time to paint. I painted each piece and found that the paint filled in and covered up some of my poor cutting! I let it all dry and glued each square/triangle in place. I'll post the final pic in my next posting. Keep checking in! ;)
Saturday, November 28, 2009
Beacon Hill part 2
(See my previous post for the back story). These pics are of my childhood dollhouse, just as I left it years ago. She's home now and there is so much work to do! This is the kitchen. It's hard to see but I tinted the walls with a yellow wash. At the time, I thought a yellow and blue kitchen was so cheerful.
You can tell it was the 80's! Teal blue and seafoam green?! And why did I paint the bays 2 different colors? :)
Subscribe to:
Posts (Atom)