Wednesday, December 30, 2009

Westville Boy's Room

The little boy's room in the Westville is more of a nook. This is a slightly older picture to show you more of the furniture... a tad girly but he's stuck with it! The items (trophy, car, football) on the shelf are all charms that I found at a bead store. He's outgrowing the toddler's toy train so that will be put away... See the next picture in this post for a more updated look...
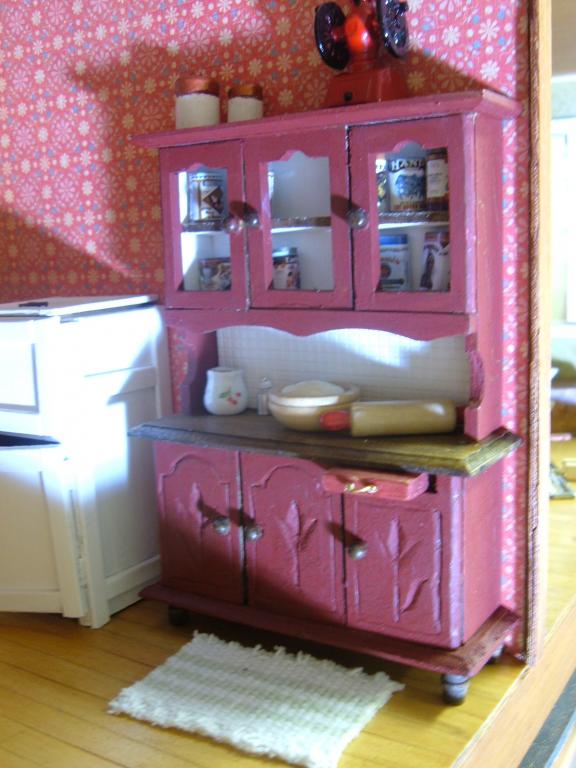
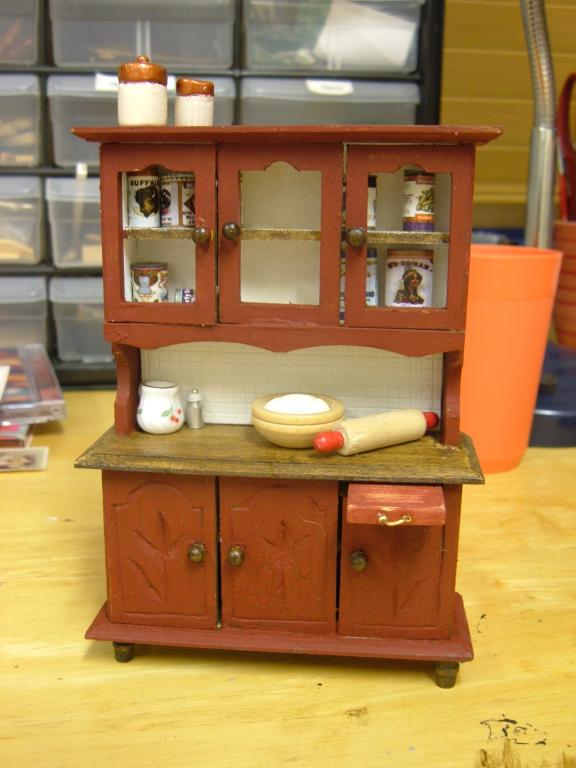
The picture below was taken more recently with more lived-in details. The Lincoln log house is just made of toothpicks. It took way too much time to make! Every notice that minis take more time than real life items? The sideboard is part of a Michael's hutch that I painted Pennsylvania dutch style. The rug is a fabric bookmark. The "painting" of toy soldiers is an asparagus label from Graphic 45 scrapbooking paper! I love that brand!

Saturday, December 26, 2009

Country Kitchen

I love country kitchens! As soon as I saw the Westville dollhouse by Greenleaf, I knew it would have to be one of those homes where you enter directly into a warm kitchen that is the heart of the home and where most of the working and living takes place. You can see the Michael's hutch from my previous posting and a tiny sliver of the living room that had the closet removed. Can you spot more pieces from those hutches? (The upper and lower cabinets near the sink). I put a lid on the bucket near the door which is for keeping kitchen scraps before they are taken out for composting. Can't have it smelling up the kitchen! The flour sacking dish cloth is ready for work on all those dirty dishes, if someone would finally install a faucet! It also looks like someone needs to pick up that fallen ice sign from the window or there won't be a delivery today, and for goodness sakes, the ice box door has been left open...
I think the black painter platter near the sink is one of the favorite minis that I've made or personalized! I'm not a great painter by any stretch, but I've come up with a couple ways to "cheat" that I'll share with you soon...

Thursday, December 24, 2009

May all the blessings of the season be yours this holiday!
Merry Christmas and Happy Holidays!

Wednesday, December 23, 2009

Multi Purpose Michael's Hutches

Michael's craft stores sell these wonderful $1 hutches that can be bashed into just about anything, like the framework to my built-in bookcase in the last post. Sometimes though, just a little tweaking makes it just what you need!

I took this darling one and carved in some arches and rough flowers on the bottom cabinet doors. I then cut out a portion of the top of the right hand cabinet door and slipped an longer piece of wood through the notch to make a cutting board. I glued in a little support underneath it inside with a little scrap of wood. Can't have the cutting board falling down while you're trying to use it!
I then covered the whole thing with an antiquing polish that gives it that rustic walnut look. You can still see that color on the main counter. Crackle finish was applied to the whole outside except for that counter and Ceramacoat's Barn Red paint was painted over that. The picture below is that closest to the actual color.
The "tile" backsplash is from a sheet of plastic textured shelf paper! You never know where you'll find mini supplies! A little wire and two crimp beads glued on finished off the hardware and there you go... a $1 hutch that fits my country kitchen! Details on a homemade sink and icebox coming soon!

Sunday, December 20, 2009

Adding Details to the Book Nook

Now that I removed the closet, there's a cozy place to curl up with a book or compose a little music. Pardon the feather duster on the shelf... there's construction dust to clean! (see previous postings for details). Here it is as part of the living room. It still feels a tad empty... I'm really not sure what to do with all the middle space. I love how it "feels" though!

Closet? Who Needs a Closet?

In my last posting, I talked about how I make molding panels to add details along the stair wall of my Westville dollhouse. When it came time to attach it, I started thinking... a dangerous thing! That closet under the stairs was a big waste of space! I could put cleaning supplies and storage on display under there but I already had a whole attic for that. Hmm.. what if I take off the doorway... Better already! The elf will have to move out!
I then used any and every tool that I could think of to hack away at the wood. I have a dremel but I really need lessons in how to use it. For me, sometimes hand tools like a utility knife just feel more satisfying as I hack away. The painted area of wall was the only visible wall space before.
I test fit part of a Michael's hutch to work as a "built in" bookcase and with a lot of sanding, finally made it fit. I then found a scrap of foam board to replace the side wall I had just cut out. Remember, I was just hacking away with the knife. If I had planned ahead I could have left that section of wall intact. Hindsight is 20/20!
Foam board also smoothed out the underside of the steps so there is a smooth sloping wall. I used textured scrapbook paper to line the back of the bookcase. I love how it imitates bead board! I had to patch in the wood floor before the final fitting, but again because this was a spontaneous "bash" I accidentally used the wrong stain. Sigh.
I trimmed it out with scraps of molding and a shelf on top of the bookcase. I used the same bead board look scrapbook paper on the side wall of the stairs to mask the foam board patch. Finally, you can see a couple of the wood panels I made in the last posting. I will be making a couple of final adjustments, like that mismatched angle, but finally, a little more floor space! I'm picturing a rocker and blanket to make a little reading nook. Time to rearrange furniture!

Monday, December 14, 2009

Molding Minus Math

I've often admired the molding and paneling details in so many dollhouses and wondered how anyone could make it look so beautiful and straight! Perfect angles too. I would still love to know from any of you who have ideas for me... please share your expertise. Since I didn't know how, I made it up!

First, I put newsprint against the wall I wanted to attach the molding to. In this case it was the wall under a staircase. Can you see the railing openings? I took a rubbing of it, just like back in elementary school when we'd make leaf rubbings!

I then drew lines with a ruler (this helped with the straight part!) wherever I wanted the moding to be attached. I needed really narrow molding which I didn't have and so decided to make my own of that too. In the picture below, you can see "ceiling and door trim" from miniatures.com. It was too wide of course so I cut strips of it. Voila...narrow molding! It's even the right size for picture framing.
The next step for me was to smear a little glue stick over the pencil lines so the molding wouldn't slip around. I laid a strip down, marked where it touched the pencil line and cut. I continued the same way on all my drawn pencil lines with a little sanding here and there and a touch of glue in the corners. I still have no idea what degree each angle is but I didn't have to using this method, thank goodness!
The fact that each piece was glued to the paper was very handy to when it came time to paint. I painted each piece and found that the paint filled in and covered up some of my poor cutting! I let it all dry and glued each square/triangle in place. I'll post the final pic in my next posting. Keep checking in! ;)

Saturday, November 28, 2009

Beacon Hill part 2

(See my previous post for the back story). These pics are of my childhood dollhouse, just as I left it years ago. She's home now and there is so much work to do! This is the kitchen. It's hard to see but I tinted the walls with a yellow wash. At the time, I thought a yellow and blue kitchen was so cheerful. You can tell it was the 80's! Teal blue and seafoam green?! And why did I paint the bays 2 different colors? :)
You can see that I tried to paint a panelling effect on the side of the stairs. The wax spots on the stairs were for holding the red corduroy carpet runner into place.
Pink and white below in the little girl's room:
This is the brightest yellow ever. Again, I must have loved the blue and yellow color combination. The painted triangles on the window were a great touch though!!

My Beacon Hill is Home!

It was Christmas, 1987 and I was hoping for a dollhouse. When I tiptoed out into the living room early Christmas morning I realize that the enormous cloth covered mound near the tree was probably it! I lifted just one corner and saw what seemed to be plastic. Putting that together with the size, I thought Grandma was giving me a big plastic Barbie house. This wasn't what I had anticipated, but I knew my reaction would mean a lot to her. Quickly getting back in bed, I planned a whole dramatic scene; hand to forehead, a gasp of surprise and several planned exclamations to express my gratitude and amazement.
When I was officially allowed out and the cloth was removed, my pretend amazement routine was officially forgotten. I had a wooden Beacon Hill Dollhouse complete with Christmas wreath on the door. I was genuinely stunned and the exclamations were real. It became more that just a toy but a whole other world for me. I spent hours arranging and playing and fantasizing that I was living in the victorian era.
Fast forward 22 years and picture that well loved dollhouse sitting dusty in storage several states away from my home. Then just 2 days ago, my wonderful husband helped make a miracle happen...my Beacon Hill is home! I can't express how ecstatic I am! There is so much happy work to do as you can see in these pictures:
See all the dust? Yikes! The greasy marks on the walls are from the wax I used to put up wallpaper in this dining area. The picture below is of the bathroom just the way I left it. The "valance" is a cupcake wrapper! I painted a frosted effect on the lower pane with glue. At least that effect is a keeper!
Here's an overall view of the house below. I evidentally wasn't afraid of color!

Monday, November 23, 2009

Come in and put your feet up!

Hi all! This is an amazing virtual tour of a dollhouse that is so realistic you may want to check what's in the oven. In fact, that's exactly what you should do because there is something in the oven and in the shed and in every nook and cranny of this beautifully crafted house! Once you enter, move your cursor over the page to find all the embedded links that will take you through doorways, upstairs, and closer to wonder details. Get some hot cocoa and enjoy!

http://www.lindas-miniaturhaus.com/Sites/spielhaus/SPH-start.htm

Wednesday, November 18, 2009

Westville Bedroom

Since I posted the quilt tutorial yesterday, I thought I should share what my Westville bedroom looks like now. It still needs pillows and a couple more accessories but it's on it's way! The sun might have been a little too bright on that furniture! I just picked up the guitar and case at a local show and the dresser was at a flea market.
See the lovely crocheted blanket? I get no credit because I bought it also. :)

Monday, November 16, 2009

I know I've mostly been posting about my Orchid but here's an early picture of the bedroom of my Westville. I used a couple different shades of cream and yellow to weather the walls and five them a bit of a glow. The rug is a circle cut out of scrapbook paper. A little fringed fabric glued under the eduI love Graphics 45 for beautiful vintage designs! They have Shabby Chic to World War II era and each paper is double sided so you have 2 coordinated patterns.

I've been so inspired by the beautiful mini-quilts made by others (see below) that I tried my own, including a real life shortcut. Here's a couple inspiration and tutorial links:
Quilt tutorial (This one is so clever!)
Liberty Biberty Quilt tutorial (Mercedes does a wonderful job of letting us in on all the details with pictures).

Beautiful, huh? My shortcut (because I am lousy at sewing!): Instead of cutting out itty-bitty squares, I cut 1 inch wide strips and sew them together, side by side. This makes a large square of "striped" fabric. I then turned that block sideways and cut across the strips, again 1 inch wide. This makes a long strip of tiny squares already sewn together. Match those up and sew those square strips together and I have the quilt you see above. Happy sewing!

Sunday, November 8, 2009

Details

Sometimes photos like these give you just the details that your need to complete or recreate a scene or time period. Click to enlarge any pics (I hope I've gotten it right this time!) Enjoy! Architectural pics will come soon!


Sunday, November 1, 2009

Antique Simplicity and Texture

My favorite antiques are those that are worn and textured, having been held and used for generations in caring for loved ones. I would love to one day have an entire kitchen full of these wonderfully simple tools. These are pictures that I took near Savannah, Georgia, at the Tybee Island lighthouse. Click on the pictures to enlarge them:
This is my favorite!

Sunday, October 25, 2009

Crepe Paper Rose

Something about fall makes me want to work on minis! This is a close up on a couple of homemade items in my Orchid. Just click on the picture to see them larger.
  • I made the rose out of crepe paper (yes, the party kind of crepe paper!), getting the idea from Martha Stewart. The thin paper ruffles and ripples easily as you stretch or roll it using a toothpick to roll the edges of the petal. I never would have thought of it but Martha did!

Here are Martha's instructions: crepe paper rose

  • The (crooked!) candle is a bit of thread dipped in melted candle wax. A little black marker tinted the "burnt" wick.
  • The flower vase is an endcap used in making jewelry. Easy but intricate!
  • The base of the candle is made of polymer clay. The pattern came from pressing an eyelet setter into the clay. I then painted it gold.
  • I made the painting too by dipping the end of a toothpick into different shades of paint, never wiping it off, making loose "u" shaped strokes. I havent' been able to get another to work out as well unfortunately!
  • The lace runner is two short strips of lace glue lightly to each other to make a wider strip. I love how thin it is... I found it in a fabric store and think it was designed for lingerie maybe?

Monday, October 19, 2009

The Orchid Dressing Area

A dressing room for the lady of the house!
One interesting quirk about the Orchid is that it has an awkward knee space under each of those upstairs windows. I decided to create a "built in" false dresser in that space. Since I have no clue how to make a real drawer :) I just made a shallow 3 sided box (with a bottom) and glued it on the front of a square of balsa. Just have a couple pieces of fabric hanging out and no one will know it's false! See my diagram:

This vanity is the bottom portion of a Michael's hutch. (I love those things!) I then cut the arched back and a shelf from basswood. The two posts holding up the shelf on the corners are just cut off portions of turned posts for chairs like you can buy from miniatures.com. I then went a little crazy with a crackle finish. The jars and brush are just beads and a charm.

Lastly, the mirror is a chipboard frame from scrapbooking. I dipped string in glue and glued it on in swirled designs. I added a couple clusters of seed beads for more detail. White paint covered it all. Done!

Thursday, October 15, 2009

The Orchid Bedroom

As with everything mini, this room is still work in progress. The pics don't hide the flaws very well! I'm one of those people who loves to know all the details on how people make the things they do so I'm going to share some details of my own:

The hanging wall shelf is a section of a Michael's hutch. I cut the trim from a different one to use as the scalloped detail on the bottom. The lace edging is just cut from a larger piece of lace. See the rug? It's scrapbook paper! I frayed the edge of a strip of fabric and glued in under the edge for the fringe. 
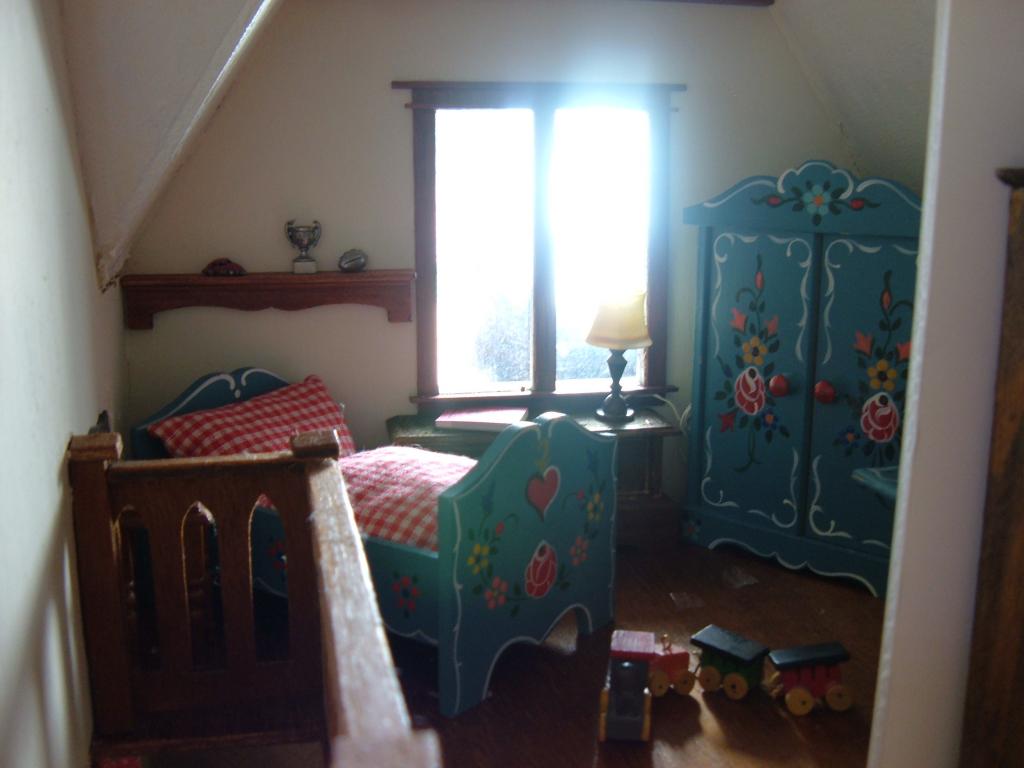
The complicated design on the trunk was a stamp from my scrapbooking supplies. After I stamped the design onto the wood, I used the end of a toothpick to touch in details of paint and when dry, stained over it. There are also 3 bead charms in the pictures: the silver box next to the chair, the mini teapot on the shelf and the scissors on the table.
The wood triangle over the bed is balsa wood and so is very soft. I bought it before I found out that basswood is the right wood to use for mini wood projects. Happily though, because it is so soft, I was able to use a $6 engraver from Walgreens which is usually used to write your name on electronics to "carve" into the soft piece of balsa. It burns right through the wood, creating those holes and engravings. Too fun!

Tuesday, October 13, 2009

The Kitchen

Here is the Orchid's kitchen. Don't mind the crooked curtains! Can you spot the Michael's hutches? There are three.

Monday, October 12, 2009

The Shoppe

Remember the Orchid I rehabbed? Here's a peek on the inside as it looks now. Inside The Sewing Room, home and business of a woman at the turn of the century.


LinkWithin

Related Posts Plugin for WordPress, Blogger...