Showing posts with label antique. Show all posts

Thursday, October 13, 2011

Beacon Hill Identity Crisis

Well, maybe not a crisis yet; but it could be if I stay this indecisive. Can I have a little sympathy? :)

It's fall which seems to restart my minis interest; some kind of nesting instinct, I guess! I've come back around to rehabbing my childhood Beacon Hill and was still wrestling with what to make of it. Another house? Modern family who likes antiques? PA dutch influence? No, that just clashes with the Victorian architecture. I just wasn't feeling anything until I thought of this idea:

I believe it's going to be a girls' school that takes in a boarder or two. I am a teacher and collect antique schoolbooks and recently found a "Elementary Home Economics" course book for girls of 1922 teaching everything proper about Cookery, Sewing, and Care of the Home." It is delightful!

Did you know that there are two kinds of "vitamines" and that fat is one of the 5 foodstuffs? Works for me!! If anyone has lost their recipe for Prune Whip, I've got you covered! :)
Look at this wonderful picture below:
Can't you just picture these girls working and learning in the Beacon Hill?

Wednesday, July 20, 2011

More Mysteries

I knew I asked the right group of people about my mystery items yesterday! Thank you for your responses! Punch needle and bias tape makers sound right. The clips don't have a hole in the end however; the metal is just folded with a chisel shaped tip; no openings except the side just like a big binder clip. Would that still work?
Here is the lovely sewing chest that started it all.How about the prices on these Boye hooks below? I wish my hobbies were that cheap now! 1930's-40's maybe?
The two below are unmarked on the other side of the throat, completely smooth.
These are my next mystery hooks. The first is marked "minerva".
#2 doesn't have a throat at all, #3 and 4 are stamped (not raised) with 10 and 13 but nothing on the other side and the last has no markings at all and that interesting hole.
The heads are so tiny!

Antique Find and a Mystery for all you Crochet Friends

I just made the most wonderful antique find that had my name written all over it... literally! My husband and I were looking through an antique shop and I saw one of those sewing boxes on a stand. Being nosy, I opened it up and it was as if I had opened a time capsule! The entire box (which miraculously still had one tray left) was full of antique and vintage crochet hooks, knitting needles, threads, and embroidery floss. I fell in love of course and took it home. (Did I mention it was only $39 on sale??)

Then I saw the labels on the cotton threads... it was meant to be found by me!
I even found two 3 foot sections of homemade lace, a wonderfully worn embroidery hoop, and more vintage Coates & Clark thread. What a precious gift from the woman whose hands created beauty with some thread and simple tools...
I've spent hours researching all my finds and found a wonderful site all about crochet hooks by the Hook Lady. There are bone knitting needles, lots of Boye and Susan Bates hooks, 2 "Non-Inflammable" plastic hooks from the 60's and a few unmarked and unsized hooks that I'd love to know more about. There are even 2 black Boye hooks that may be a rare kind made briefly during WWII? Any experts out there? :) Here is the mystery, friends; can you help me identify these?
  1. The middle object below has a hollow tip and looks like it may be used for punch needle?
  2. The other pieces are _____? They are marked GMA USA
  3. One more hook that I missed taking a picture of... I have a hook marked VICTORIA which has an oval hole right through the throat where you rest your thumb. It looks as though it might give you a blister after a while! What is that about??
Thank you for any clues you may have to help me! I love a good mystery but solving them is even better! :)


Saturday, April 23, 2011

Antiquing Covers a Multitude of (Paint) Sins!

It's been too long since I last posted! I'll apologize with an antiquing tip! :) Remember the Colonial Blue Cabinet? It needed some antique redware plates to match!
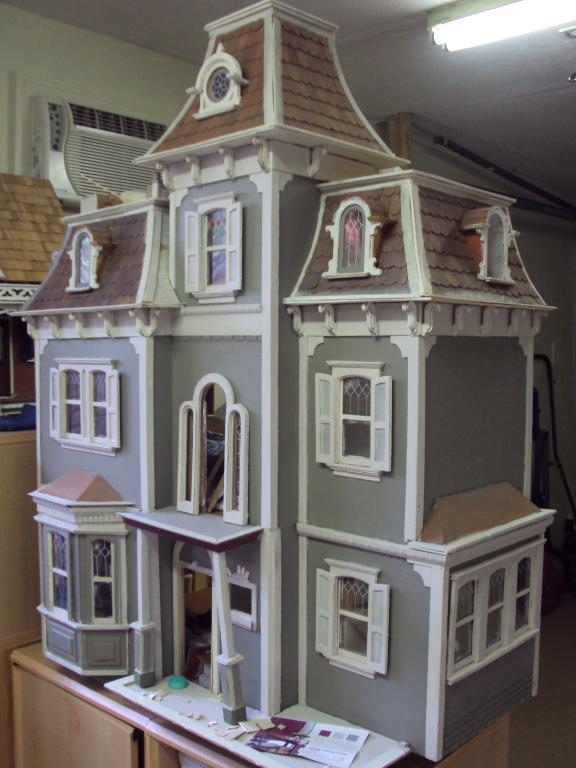
These plates used to be the blue splatterware metal plates that are sold so cheaply at places like miniatures.com. I gessoed them to prime it and then used toothpicks to paint a PA dutch style design. Every paint mark was either a dot or a dragged dot to make leaf or teardrop shapes. Obviously painting is not my gift! Time to cover it up by antiquing it!I use Folk Art Antiquing Polish which does a wonderful job on wood too!
They don't look so pretty close up but with a little more buffing, wiping and placement in a cabinet, I've got antiques!
A little more character for my cabinet!

Sunday, August 1, 2010

The Secret to Making Antique Paper

I LOVE antique books and collect antique school books. Nothing can match the mellow, rich colors of vintage papers and books, but I sure can try to recreate it in miniature. Below is a House of Miniatures desk kit that I just stained and finished (although the hardware is still giving me fits). But while I had the wood stain out, I decided to do a little experimenting...
I had printed out several book covers from one of those printables sites but they just didn't look realistic enough for me so I grabbed a few of them and started painting them all with the same wood stain I was using on the desk! I even used the same Ceramcoat Satin Varnish. Here they are:
Much better! When making books for bookshelves, I usually fold and glue the paper covers around a piece of white foam (like kids use for crafts). Fast and easy! This time I decided I wanted pages, real paper pages. I folded the newly stained covers as usual and put a nice smear of tacky glue in the binding part and started tucking pages in. I thought it looks much more realistic for a setting like on this desk:
Of course, white paper in an antique book? That just wouldn't do! I also think that good old copy paper can look a tad thick. I made a ton of antiqued paper for the books and also stuffed the drawers! Can you see the subtle shading of tans in the papers below and how "to scale" the thickness of the paper is? They look even better and more antiqued in real life. The Secret of Making Antique Paper is below....
Parchment Paper!
Yup, the cheap stuff you buy in the grocery store for baking.
(**You CANNOT use wax paper for this!!**)
1. I used my paper cutter to cut long strips.
2. I then cut those strips into paper size widths.
3. The antiquing magic happens when you take all those pieces, put them in a pie tin
and bake them until you have the right color!
Parchment paper turns the most wonderful shades of antique tans when cooked. I have baked whole sheets at a time thinking it would be a shortcut before, but it mostly browns on the edges. Cutting them first is the key.
Just be ready to explain to your family why there aren't any cookies being served afterwards :)

Happy Baking!!

LinkWithin

Related Posts Plugin for WordPress, Blogger...