Tuesday, December 28, 2010

Log Cabin Christmas

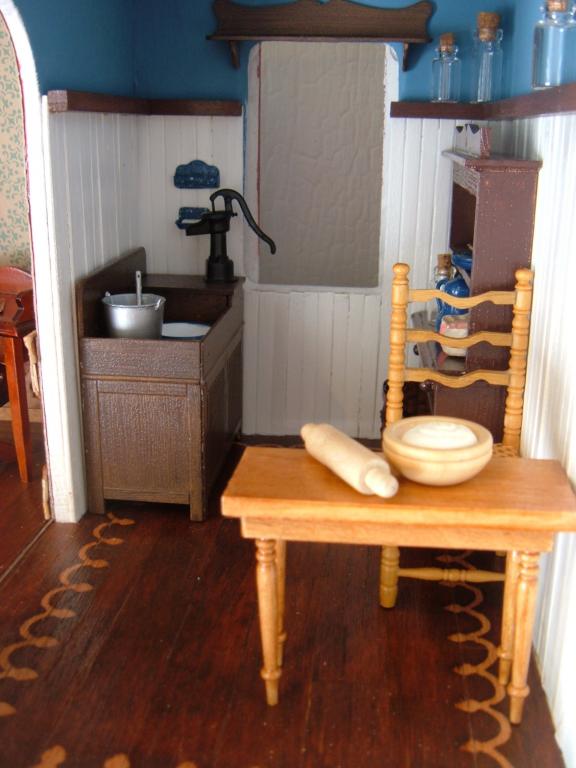
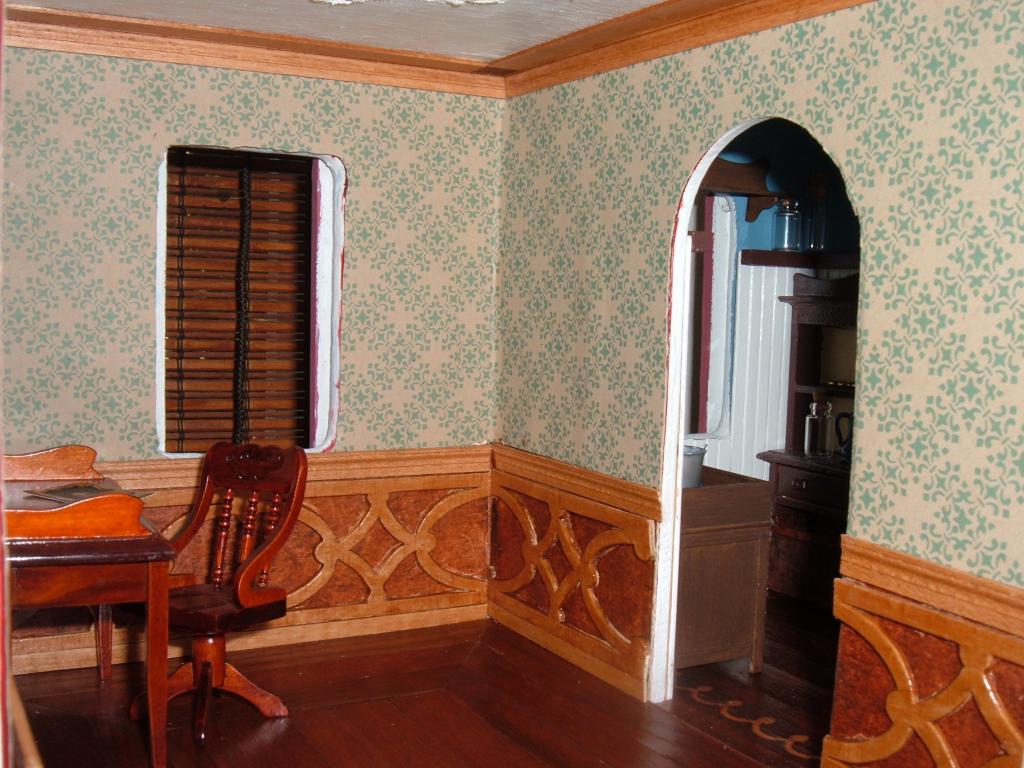
My mom has always wanted to live in a log cabin and so I decided to give her one for Christmas... a mini roombox version, of course! I tried to fill it with personal touches that would make the perfect place to retire, full of family pictures, her hobbies and love of the guitar, music, crocheting and knitting and mementos of places she has visited. She also loves blue so I tried to add touches of it wherever possible. Here are pics of when this roombox was almost complete. I'll follow up with a post or two of some of the particular tricks and tips relating to making this box. If you see something you want to know more about, leave a comment and I'll share whatever I can. Don't forget to click on the pics for details. :)


Tuesday, December 14, 2010

Many Mini Projects with Michael's Hutches!


I've been working on a top-secret mini project (it is nearly Christmas after all!) but I've missed posting for you all! In the US, we have a craft store named Michaels that sells these little wooden hutches that are just a little smaller than 1:12 scale but can be bashed into SO many things! I used to just paint or stain them but then I found out that if you just warm them a little (seconds) in the microwave, that you can just pull them to pieces and create something new. That same principle works really well with almost any mini furniture that is glued together! Here are some pics of things I've made using those wonderful, $1 hutches. Happy bashing!


Sunday, October 31, 2010

Shabby Chair & Screened Armoire

I'm still in a shabby state of mind! I crackled the (formerly) red mahogany chair below with an undercoat of black paint and paired it with a soft cream and sage checked fabric. At first I wasn't sure if that color combination would be too strong but I like it. The rusty wreath was inspired by Susanna of http://miniaturedreams.blogspot.com/. She makes the loveliest things! Thanks for sharing, Susanna!
This is the first time I've used screening in an armoire to imitate a chicken wire effect. They are pieces from a screen repair kit! It pays to keep your eyes open at the hardware store!
There are some very subtle baby pink details along the bottom and on the molding around the doors. Paperclips make great hangers. Click on the pics to see a little closer if you'd like :)


Tuesday, October 19, 2010

Shabby Chic Shelving Tutorial

I've heard other miniature artists talk about how they use graph paper to make their designs and they won me over once I tried it for myself. Since I can't ever seem to cut on a straight line, using paper that takes care of that for me sounded perfect! The fence that I turned into shabby shelving in my Orange Blossom was created using the technique below.

First, I got out my paper, double sided tape and some wonderful shaped cocktail sticks that I once found in a dollar store. I then drew the curve for the top of the fence section on my paper. since the graph paper is marked in quarter inch increments, I could guarantee I was making it the exact size I wanted. I also used those marks to evenly space the fence posts. Two strips of double sided tape across that paper made sure everything stayed just how I placed it!
I wasn't worried about the bottom of each post not lining up; I simply drew a line using the graph paper as a guideline. I waited to cut the posts until after gluing the cross pieces but that was a mistake! So awkward to cut. Next time I will cut first and glue second. Below you can see that I created different size sections because originally they were to be fence sections for a particular area. I like them so much better for shabby chic shelving!
With a little paint and weathering, the were just right! Not bad for cocktail sticks, double stick tape, and a sheet of graph paper. :)

Thursday, October 14, 2010

A Tale of Two Chairs

Sometimes two aren't better than one! I got these two little chairs for a dollar in a bargain bin at a craft store. Cute but dull and the flowers weren't quite my style. While looking at them side by side, I thought that they would make a cute little child bench for the children's nursery in my Beacon Hill. First I worked to the saw to try to cut off the legs that would be touching but that was just too much work! So...
7 seconds in the microwave did the trick! The heat made it easy to pull the chairs apart. If you do this, PLEASE stay close and only do it a couple seconds at a time. Minis aren't worth a fire or burnt fingers! I finished with my saw again, used glue and bits of molding and dowels and finished my shabby little bench.
Here it is, rather rough and unfinished but I love it :) I'll scrape off the extra bits of glue and paint the whole thing again, but this shabby look is perfect for now. I even love that it is a little "bottom heavy." I think it adds to the childish feel, just perfect for the kids' room.

Saturday, October 9, 2010

Finally Found it: Beacon Hill Update

I finally found the right shade of paint for my Beacon Hill! This is my childhood house, the memories of which reawakened my interest in miniatures about two years ago. The background story is here with a little more follow up here and here (<--- click on the words to link to those posts). It starts as a good Little-Girl-on-Christmas-Morning story, then descends into a tale of Dollhouse Neglect. Now I hope we are getting a little closer to Happily Ever After! What do you think?I love this shade of paint by Martha Stewart called Mushroom. It is just the right shade of gray with undertones of olive or even blue depending on the light. I've also weathered the shingles a bit with shades of gray and alcohol-ink washes to grey them a bit closer to realism as well. The epiphany came when I realized that tester-size pots of paint were available for less than $3 a piece in every possible shade that the paint store could come up with. Since I am SO dependent on color for inspiration, I just couldn't move on to anything else with this house until the exterior color was right. I also found some nifty ways to add more architectural interest to the outside of the house and break up some of the vertical lines. More details to come in future posts!
Previously, I wrote in this blog about my color woes, trying so hard to find the just the right shade of paint for the exterior : http://antiquedaisy.blogspot.com/2010/02/house-of-many-colors.html And no wonder! Look through the pics below to see all the patches of color that I was trying out! I was limiting myself to acrylic craft paints. Thank goodness for Martha Stewart.

Friday, October 1, 2010

My Trick for Making Realistic Wood Floors

I adore wood floors, even the mini kind! Whether stained, painted, parquet, or rustic, I think they make a dollhouse seem lifelike and warm. Below is the tiny kitchen floor in a house I no longer have. In the staining process, I did a sort of reverse stencil on the floor. I masked off the design around the edges and then stained. I then removed the stencil and sealed it. When I sealed it with Modge Podge it blended just the right amount of stain onto the masked area to tint it slightly. Happy accident!
Next is a very ugly room in that same early house. I only show it here so that you can see that the flooring is cut with 45 degree angles in the corners for a different parquet-like effect. Two tones of stains were also used (although it's difficult to see).
Next is a mahogany stained floor in my Orchid with narrow planks to fit the scale of this tiny house. It was the first wood flooring I tried and I loved how it turned out.
Here in my Orange Blossom, you see not only wood floors, but also plank walls. All of my houses have used the exact same trick that I'm about to explain...
Each was created using veneer tape like you see below! For someone who was mostly working with scissors, it was approachable and easy! I found it in our local big brand home improvement store. It is originally for finishing the edges of plywood but mini-people always find new ways to use things, don't we? :)
Below are a couple of the walls of my Orange Blossom. I wanted light wood walls; obviously this unfinished wall would not give me that effect.
So, I got out my handy wood veneer tape (the birch kind) and started... ironing! Yes, this wonderful stuff already has glue on the back and irons right on. It's probably the last time I used my iron for any good purpose LOL! All you need is a pair of scissors to cut it to length. If you want it to be more narrow than the 3/4 inch width it comes in, just cut it with an craft knife. If you need to fix the placement after putting it down, just warm it again, move it and iron in the correct location. In the picture below you can see it in process.
Because it is real wood, it takes stain beautifully and has wonderful variations in the grain. The kind below is birch, but there are other woods usually available too like the heavily grained kind in the Orange Blossom's floor. Below is the same finished walls with just a natural stain to keep it light. Scroll back up through the pics in this posting or in my galleries and you can see all the variations.
By the way, are you wondering how to fit an iron in the tiny rooms of a house that is already built? The easy answer is... don't. Cut mat board or card stock to the exact shape of your floor and iron to that. That's what I had to do in my Westville kitchen and living room to get in all the nooks and crannies. Happy ironing!!

Sunday, September 26, 2010

The Galleries Are Open!

My Galleries are Open! At the top of the sidebar to the right -----> there is a list of three galleries of houses that I have completed. Then again is any dollhouse ever really complete? A couple of the pages had a 1-2 pics previously but now they are full of pictures that you can click on and enlarge and spot all the little details and mini-flaws! Enjoy!

You can visit the Orchid Ladies' Shoppe:

or the Westville which is a 1930's farmhouse:

or the Orange Blossom, which is a citrus packing house from old Florida:
See all the pictures for each in the galleries. Happy clicking!

Wednesday, September 15, 2010

Vintage Graphic Art Meets Furniture

I have this thing for vintage signs and labels; the whole graphic design-meets-antiques is so appealing to me! Years ago in Country Living Magazine I saw an ad for a dresser that was decoupaged with an old vintage poster across the drawer fronts. Since my husband wouldn't quite understand me doing that to our real life furniture, I get to try it in mini! That's what this hobby is for, right? Totally whimsical and just fun to do! The fruit butter cabinet above has the ends of fancy toothpicks for handles.Moo-ving right along (ha, ha)...Bess Milk label is just quirky and fun enough to liven up my neutral kitchen in the Beacon Hill. Each panel opens downward to be a vegetable bin, holding potatoes and onions and the like. I might have to age it a bit to mellow it.
The dry sink probably won't be in this room, but it's fun to see the country and vintage theme coming together. Just keeping it country :)

A Little Bit Country...

... but not at all rock-n-roll! I found this House of Miniatures drysink kit already assembled for $2 at a odds and ends store and decided that since dry sink= country, I would go all out with a aged painted finish like you see in Pennsylvania dutch furniture. It had to be painted because...
... whoever assembled the kit previously intended to stain it and mixed stain with the glue to make sure there would be no glue spots showing when they stained it after assembly. Ingenious! Not the color stain I wanted though, so I got to play with paint. Can you see the dark brown spots at the joints?
Below you can see the silvery grey aging that I added by painting on a mixture of black India ink and rubbing alcohol. It works miracles! After that dried, I painted, sanded, applied stain over the paint and sanded some more.
From blotchy natural wood to weathered and worn, just the way I like it. Now if only I could figure out how to make hardware...

LinkWithin

Related Posts Plugin for WordPress, Blogger...