Hi all! This is an amazing virtual tour of a dollhouse that is so realistic you may want to check what's in the oven. In fact, that's exactly what you should do because there is something in the oven and in the shed and in every nook and cranny of this beautifully crafted house! Once you enter, move your cursor over the page to find all the embedded links that will take you through doorways, upstairs, and closer to wonder details. Get some hot cocoa and enjoy!
http://www.lindas-miniaturhaus.com/Sites/spielhaus/SPH-start.htm
Monday, November 23, 2009

Wednesday, November 18, 2009
Westville Bedroom
Since I posted the quilt tutorial yesterday, I thought I should share what my Westville bedroom looks like now. It still needs pillows and a couple more accessories but it's on it's way! The sun might have been a little too bright on that furniture! I just picked up the guitar and case at a local show and the dresser was at a flea market.

 See the lovely crocheted blanket? I get no credit because I bought it also. :)
 The sun might have been a little too bright on that furniture! I just picked up the guitar and case at a local show and the dresser was at a flea market.
 See the lovely crocheted blanket? I get no credit because I bought it also. :)
Monday, November 16, 2009
 I know I've mostly been posting about my Orchid but here's an early picture of the bedroom of my Westville. I used a couple different shades of cream and yellow to weather the walls and five them a bit of a glow. The rug is a circle cut out of scrapbook paper. A little fringed fabric glued under the eduI love Graphics 45 for beautiful vintage designs! They have Shabby Chic to World War II era and each paper is double sided so you have 2 coordinated patterns.
 I've been so inspired by the beautiful mini-quilts made by others (see below) that I tried my own, including a real life shortcut. Here's a couple inspiration and tutorial links:
Quilt tutorial (This one is so clever!)
Liberty Biberty Quilt tutorial (Mercedes does a wonderful job of letting us in on all the details with pictures).
Beautiful, huh? My shortcut (because I am lousy at sewing!): Instead of cutting out itty-bitty squares, I cut 1 inch wide strips and sew them together, side by side. This makes a large square of "striped" fabric. I then turned that block sideways and cut across the strips, again 1 inch wide. This makes a long strip of tiny squares already sewn together. Match those up and sew those square strips together and I have the quilt you see above. Happy sewing!
Sunday, November 8, 2009
Details
Sometimes photos like these give you just the details that your need to complete or recreate a scene or time period. Click to enlarge any pics (I hope I've gotten it right this time!) Enjoy! Architectural pics will come soon!


Sunday, November 1, 2009
Antique Simplicity and Texture
My favorite antiques are those that are worn and textured, having been held and used for generations in caring for loved ones. I would love to one day have an entire kitchen full of these wonderfully simple tools. These are pictures that I took near Savannah, Georgia, at the Tybee Island lighthouse. Click on the pictures to enlarge them: 

 This is my favorite!


Sunday, October 25, 2009
Crepe Paper Rose
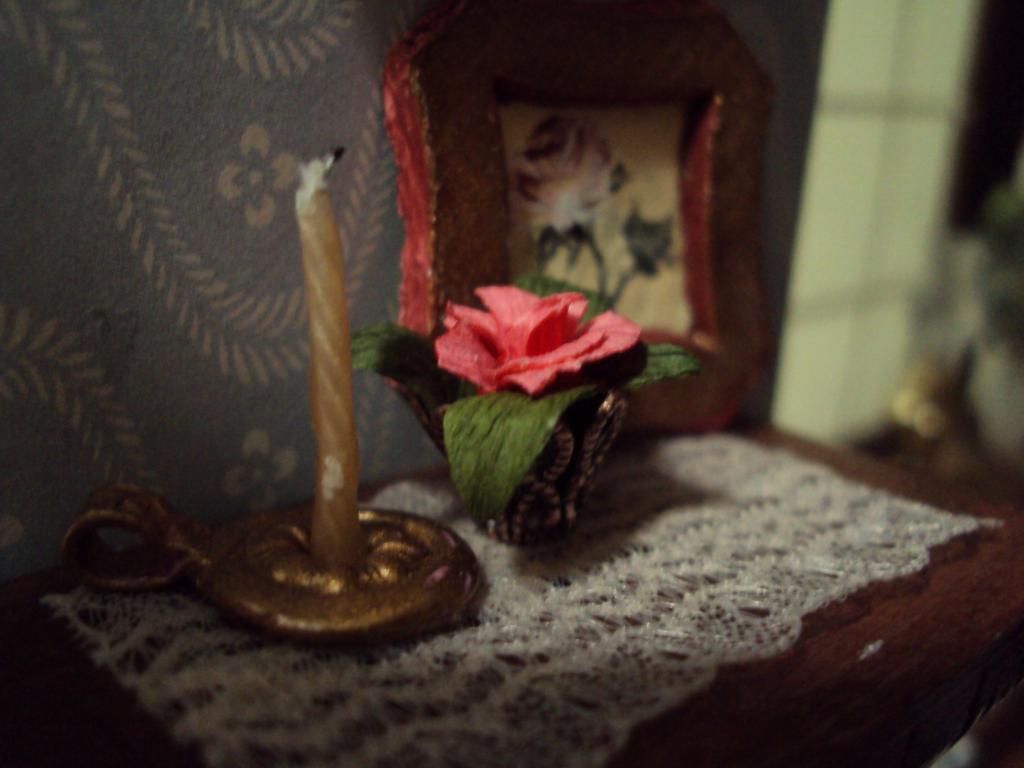 Something about fall makes me want to work on minis! This is a close up on a couple of homemade items in my Orchid. Just click on the picture to see them larger.
- I made the rose out of crepe paper (yes, the party kind of crepe paper!), getting the idea from Martha Stewart. The thin paper ruffles and ripples easily as you stretch or roll it using a toothpick to roll the edges of the petal. I never would have thought of it but Martha did!
Here are Martha's instructions: crepe paper rose
- The (crooked!) candle is a bit of thread dipped in melted candle wax. A little black marker tinted the "burnt" wick.
- The flower vase is an endcap used in making jewelry. Easy but intricate!
- The base of the candle is made of polymer clay. The pattern came from pressing an eyelet setter into the clay. I then painted it gold.
- I made the painting too by dipping the end of a toothpick into different shades of paint, never wiping it off, making loose "u" shaped strokes. I havent' been able to get another to work out as well unfortunately!
- The lace runner is two short strips of lace glue lightly to each other to make a wider strip. I love how thin it is... I found it in a fabric store and think it was designed for lingerie maybe?
Monday, October 19, 2009
The Orchid Dressing Area
A dressing room for the lady of the house! 

This vanity is the bottom portion of a Michael's hutch. (I love those things!) I then cut the arched back and a shelf from basswood. The two posts holding up the shelf on the corners are just cut off portions of turned posts for chairs like you can buy from miniatures.com. I then went a little crazy with a crackle finish. The jars and brush are just beads and a charm.
 Lastly, the mirror is a chipboard frame from scrapbooking. I dipped string in glue and glued it on in swirled designs. I added a couple clusters of seed beads for more detail. White paint covered it all. Done!
One interesting quirk about the Orchid is that it has an awkward knee space under each of those upstairs windows. I decided to create a "built in" false dresser in that space. Since I have no clue how to make a real drawer :) I just made a shallow 3 sided box (with a bottom) and glued it on the front of a square of balsa. Just have a couple pieces of fabric hanging out and no one will know it's false! See my diagram:

This vanity is the bottom portion of a Michael's hutch. (I love those things!) I then cut the arched back and a shelf from basswood. The two posts holding up the shelf on the corners are just cut off portions of turned posts for chairs like you can buy from miniatures.com. I then went a little crazy with a crackle finish. The jars and brush are just beads and a charm.
 Lastly, the mirror is a chipboard frame from scrapbooking. I dipped string in glue and glued it on in swirled designs. I added a couple clusters of seed beads for more detail. White paint covered it all. Done!
Subscribe to:
Posts (Atom)
LinkWithin
